from fairdatanow import DataViewer, login, filters Exploring your remote data in a breeze
Instantly find and access all your Nextcloud data files
In order to to make use of fairdatanow, you will need a Nextcloud server url and credentials to access a folder on a (self hosted) Nextcloud server.
Use SaveLogin()’ to store your credentials
You need to type your username and password only once and store them safely with the SaveLogin() class as follows.
from fairdatanow import SaveLogin
import panel as pn

# activate panel extension in jupyterlab
pn.extension()

SaveLogin()
Next time you access the Nextcloud server you can retrieve these credentials with the login() function. In this way you avoid typing them directly in the notebook, which is not save if you need to share these notebooks with others…
To get started you need to import the DataViewer class from the package and instantiate it with the Nextcloud login() and **filters() functions. Depending on the amount of files in the cloud storage it might take some time to build the interactive file table. In this example we want to create a table for 8118 files (and counting) from the Falnama project which takes about 13 seconds.
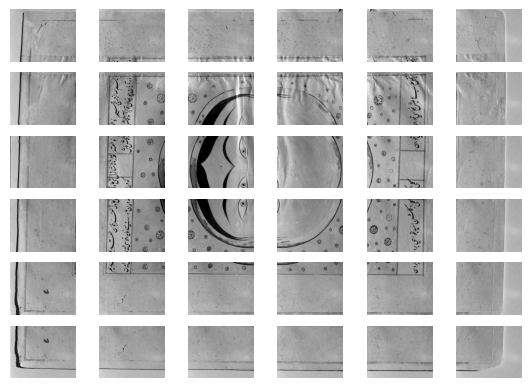
Given the complete overview of all data files in a project, you typically want find a subset of files for inspection further exploration. As an example let’s try to to filter the Infrared Reflectography (IRR) image tiles that were taken from page 71803-01 depicting the Moon. In most cases it would be sufficient to filter the file list with a simple search string search='Moon_IR tiles' in combination with a extensions=['.tif'] filter. However we see in this case that that we get a list with 73 files. So we need to be more specific. Additional filtering can be done with an advanced regular expression filter: search='.*Moon_IR tiles_\d', use_regex=True. The _\d part of the search pattern implies that after an underscore the filename should include at least one digit.
url = 'https://laboppad.nl/falnama-project'
dv = DataViewer(login(url), **filters(search='.*Moon_IR tiles_\\d', use_regex=True, extensions=['.tif']))
Connection with nextcloud server is ok.dvBelow the filtered file table one can see that we have selected exactly 36 files out of 8131 files in our Nextcloud projec folder.
Note
Note that in this documentation interactivity is limited. In a Jupyter notebook you can adjust this filter selection and observe the resulting file list.
We can now download these files into a cache folder on your local computer in order to process them further. This can be done easily with the .download_filtered() method.
files = dv.download_filtered() Ready with downloading 36 selected remote files to local cache: /home/frank/.cache/fairdatanow The file paths can now be inspected. The first four files look like this:
files[:4]['/home/frank/.cache/fairdatanow/falnama-project/07. Results/09. IRR/IRR-tiles/71803-01_IRR 1600 nm/71803-01_Moon_IR tiles_0063.tif',
'/home/frank/.cache/fairdatanow/falnama-project/07. Results/09. IRR/IRR-tiles/71803-01_IRR 1600 nm/71803-01_Moon_IR tiles_0064.tif',
'/home/frank/.cache/fairdatanow/falnama-project/07. Results/09. IRR/IRR-tiles/71803-01_IRR 1600 nm/71803-01_Moon_IR tiles_0065.tif',
'/home/frank/.cache/fairdatanow/falnama-project/07. Results/09. IRR/IRR-tiles/71803-01_IRR 1600 nm/71803-01_Moon_IR tiles_0066.tif']Let’s create a plot to see what they look like…
import matplotlib.pyplot as pltfig, axs = plt.subplots(nrows=6, ncols=6)
axs = axs.flatten()
for ax, file in zip(axs, files):
im = plt.imread(file)
ax.imshow(im, cmap='Greys_r')
ax.axis('off')